- Description
- Specification & Package
- Instructions
- FAQ
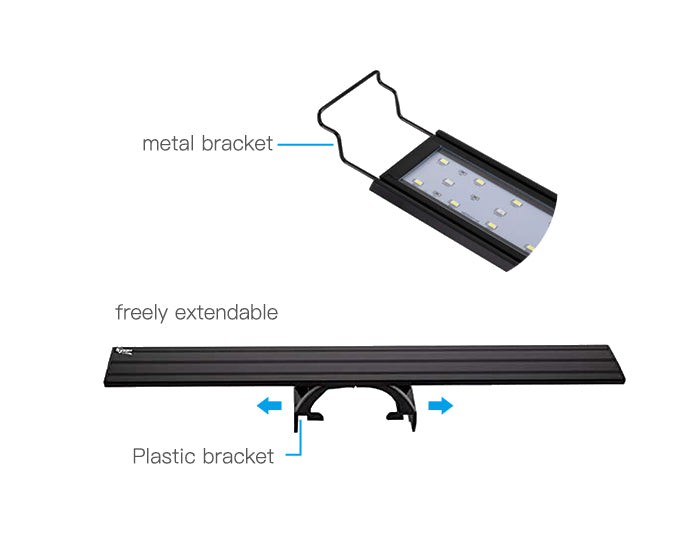
2 Kinds of Mounting Brackets
It comes with 2 pairs of mounting brackets: one pair of metal bracket, and one pair of plastic bracket, both are freely extendable. The metal brackets’ extendable length for each side is about 5 inches. Please note that it can't extend too much with plastic brackets, but it can shorten the mounting length.
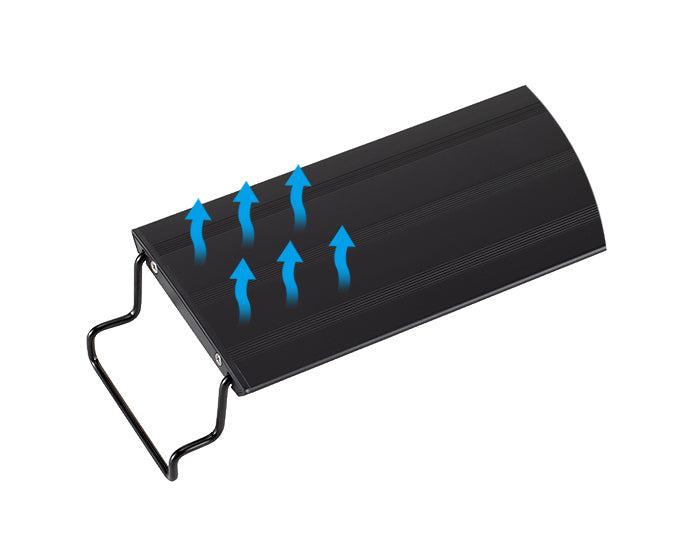
Aluminum Alloy Metal Shell
The whole shell of this aquarium light is made from aluminum alloy metal, which has a nice touch feeling and fast heat dissipation feature. The aquarium lights with plastic shell may have shorter service life time because of poor heat dissipation.
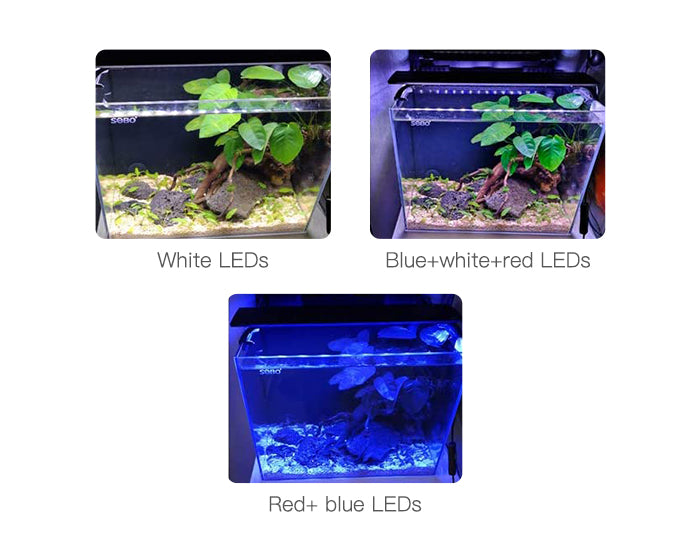
3 LED Light Color Modes
Mode 1: White LEDs.
White light is for daytime use. It simulates natural sun light to help plants to grow. It also makes the plants look more beautiful under clean water.
Mode 2: Blue+white+red LEDs
Mode 3: Red+ blue LEDs
The color light in mode 2 and mode 3 is for night time use. Color changes will make your one aquarium 3 different wonderful views.
Adjustable Brightness & Timing
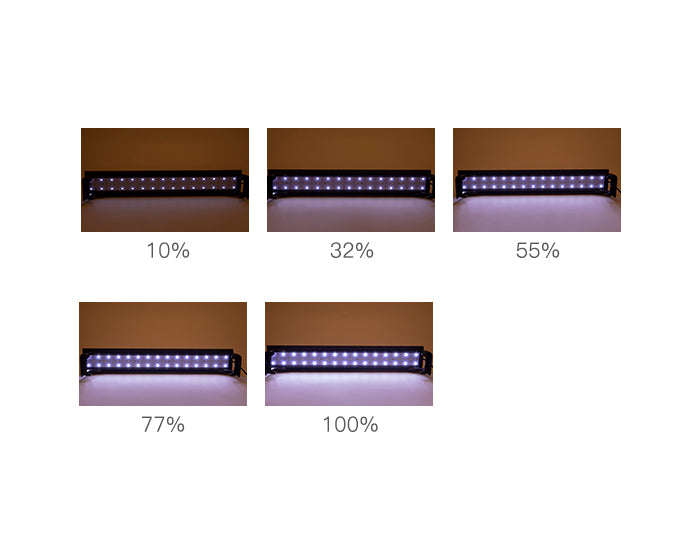
5 levels of light brightness are available: 100%, 77%, 55%, 32%, and 10%. Plus, you can set the lighting time to 3, 6, or 12 hours. Combining brightness setting with the time setting function, you can make it to simulate the light changes of day and night.
For example, if you set the brightness at 100%, and set the lighting time for 12 hours at 6:00 A.M., the light will turn to the lowest 10% brightness at 6:00 P.M.
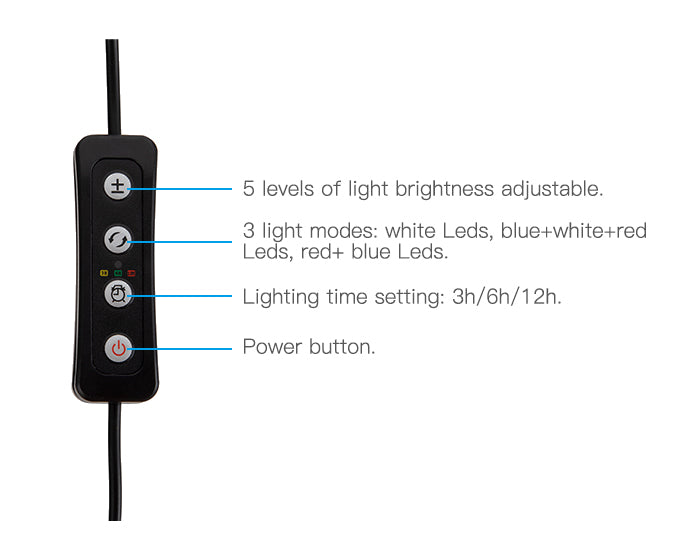
Compact External Controller
There are 4 buttons on the external controller.
The first button is for changing light brightness: 100%-77%-55%-32%-10%.
The second button is for shifting light modes: white LEDs, blue+white+red LEDs, red+ blue LEDs.
The third button is for setting lighting time, 3 colors of the indicator light indicate 3 different time period: yellow - 3 hours, green - 6 hours, red - 12 hours.
The last button is for turning on/off the light.
How to Use This Aquarium Light
Step 1: Unpack the package and choose the bracket according to your tank. Slide the adjustable bracket on the side of the fixture to match the length of your aquarium.
Step 2: Connect the 12V DC transformer to the light, and plug the transformer into outlet well. Ensure a drip loop is created before the outlet as shown on the warning.
Step 3: Press the power button to turn on or turn off the light.
Press the fresh button to choose the lighting mode: "White + Blue + Red—> Blue + Red—> White—> White + Blue + Red" in turn.
Press the ± buttonto adjust the light brightness. 8 stages are available: 100%—> 77%—> 55%—> 32%—> 10%—> 32%—> 55%—> 77%—> 100%.
Press the clock button to set the lighting time: "3H—> 6H—> 12H—> No Timer—> 3H" in turn.
3H timer: Orange indicator is on; The LED light will be off 3 hours later; It will restart at the same time in the day.
6H timer: Green indicator is on; The LED light will be off 6 hours later; It will restart at the same time in the day.
12H timer: Red indicator is on; The LED light will be off 12 hours later; It will restart at the same time in the day.
Note: In timer model, when the timer turns off after desired time period (3, 6, or 12 hours), the LED light will remain in weak brightness. That is: In "White + Blue + Red" light mode, it will remain at 10% brightness of “White + Blue + Red“ light; In "Blue + Red" light mode, it will remain at 10% brightness of "Blue + Red" light;
Warnings
1. Please keep the light away from water, because the light is not waterproof.
2. In order to avoid accidents, please keep the light away from flammable items.
3. Please unplug the power when the light is abnormally working, or before maintenance.
4. Please mind that the temperature range for the light is 23°F - 113°F.
5. Carefully examine the light after installation.
6. To avoid possible electrical shock, do not immerse the light in water. If the light falls into the water, or otherwise becomes wet, do not touch it until unplugged. If electrical components of the light get wet, unplug the light immediately.
7. Do not operate the light if it has a damaged cord or plug, if it is malfunctioning, or if it is dropped or damaged in any manner. The power cord of this light cannot be replaced, if the cord is damaged, the light should be discarded.
8. To avoid the possibility of the light plug getting wet, position aquarium stand and tank to one side of a wall mounted receptacle to prevent water from dripping onto the receptacle or plug.
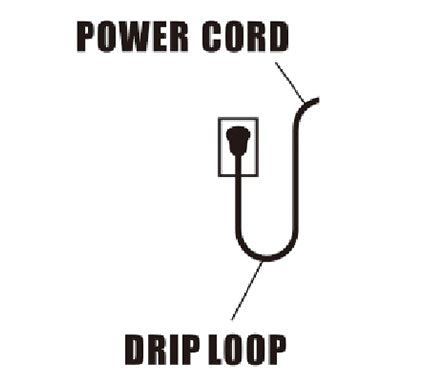
A "drip loop", shown in the figure, should be arranged for each cord connecting the light to the receptacle. The "drip loop" is the part of the cord below the level of the receptacle, or the connector. If the plug or receptacle does get wet, DO NOT unplug the cord. Disconnect the fuse to the circuit breaker that supplies power to the light. Then unplug and examine for the presence of water in the receptacle.
9.Close supervision is necessary when the light is used near children.
10.To avoid injury, do not contact moving parts or hot parts.
11.If an extension cord is necessary, a cord with a proper rating should be used. A cord rated for less amperes or watts than the appliance rating may overheat.Take care to arrange the cord so that it will not be tripped over or pulled.
12.The light is intended FOR HOUSEHOLD USE ONLY.
Product Parameters
| Model | HG-918 | |||||
| Power | 9W | 14 W | 16 W | 20 W | 25 W | 32 W |
| Input | AC 100-240 V / 60 Hz | |||||
| Output | DC 12 V | |||||
| LED Quantity (white+blue+red) | 18+4+2 | 30+6+3 | 30+8+4 | 42+12+6 | 54+14+7 | 60+18+9 |
| Light Size (without brackets) | 30x8x0.8 (cm) | 40x8x0.8 (cm) | 56x8x0.8 (cm) | 72.5x8x0.8 (cm) | 90x8x0.8 (cm) | 117x8x0.8 (cm) |
| Applicable Tank Size (Inch) | 12-18 | 18-24 | 24-30 | 30-36 | 26-46 | 46-52 |
| Power Cord Length (Feet) | 5+1.8 | |||||
| Lumen (LM) | 633 | 834 | 903 | 1234 | 1567 | 1770 |
| Kelvin (K) | 6500 | |||||
Packing List
- LED Light x1
- AC/DC Adaptor x1
- Plastic Brackets x2
- Metal Bracket x2
- User Manual x1
Usre Manual
petfocused Seller · December 17, 2019
petfocused Seller · March 1, 2022


 Free Shipping & Return On All Orders!